How to create your own options in the WordPress Customizer.
Marc Wagner
October 28, 2020
With the WordPress Customizer, you can quickly and easily provide options for your theme. I’ll show you how easy it is and how to create your individual sections.
Extend theme #
In order for you to add your own sections, we need to hook into WordPress via an action hook.
For this we first create the file “WordPressThemeCustomizer.php” in the theme directory. If it is not your theme, you should do the whole thing in a child theme.
Then open the file and add the following code:
class WordPressThemeCustomizer {
   public function __construct() {
      add_action( 'customize_register', array( $this, 'run' ));
   }

   public function run(WP_Customize_Manager $WPCustomizer ) {
   }
}
$WPTC = new WordPressThemeCustomizer();
Now, automatically, as soon as WordPress executes the action “customize_register” the function “run” from your class “WordPressThemeCustomizer” is called.
Now change to the “functions.php” of your theme and include the new class there.
require_once('WordPressThemeCustomizer.php');How to create a section. #
You can now add a new section in the class “WordPressThemeCustomizer” by extending the function “run”. The following code shows you how to add a section with the name “Title of the section”.
public function run(WP_Customize_Manager $WPCustomizer ) {
        $WPCustomizer->add_section( 'deine_sektion', array(
	      'title'       => __( 'Titel der Sektion' ),
      	      'priority'    => 120,
              'description' => __( 'Beschreibung der Sektion')
        ) );
}
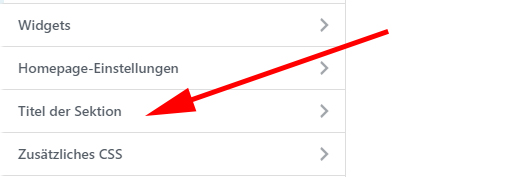
Once you have inserted the code, you can use the section for your controllers. Later the whole thing looks like this:

Note: A section is only displayed if it has at least one “Controller”. Therefore you will not see your section at the moment.
How to create a controller. #
WordPress already offers you a range of controllers that you can use to map your options. If that’s not enough, you can always add your own controllers. I’ll show you how to access the existing classes of WordPress to create default options.
- WP_Customize_Control — Used for: Text fields, textareas, selection boxes, radios and checkboxes.
- WP_Customize_Color_Control — Allows you to add a color selection field.
- WP_Customize_Image_Control — Allows you to add images.
Add text field
Let’s get started right away and integrate a simple text field. Extend the function “run” in the class “WordPressThemeCustomizer” with the following lines:
$WPCustomizer->add_setting( '_hier_kommt_mein_text' );
$TextController = new \WP_Customize_Control(
      $WPCustomizer,
      '_hier_kommt_mein_text',
      array(
	     'label'   => __( 'Mein Text:'),
             'section' => 'deine_sektion',
      )
);
$WPCustomizer->add_control( $TextController );
You can find more information about the parameters in the WordPress Codex.
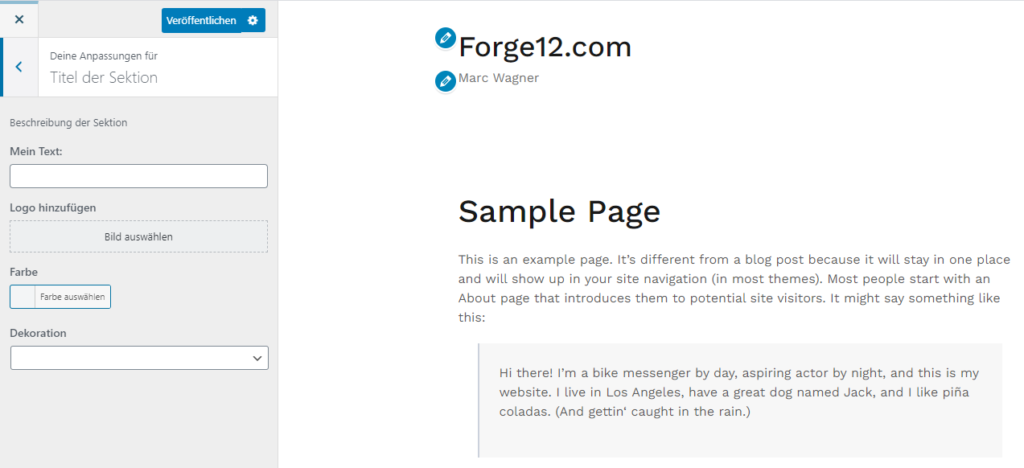
Save the whole thing and look at it in the Customizer, you should now be able to see both the section and the text box.

Of course, we can expand the whole thing now.
Add image
$WPCustomizer->add_setting( '_logo' );
$LogoImageController = new \WP_Customize_Image_Control(
	$WPCustomizer, '_logo', array(
		'label'    => __( 'Logo hinzufügen'),
		'section'  => 'deine_sektion',
		'settings' => '_logo'
	)
);
$WPCustomizer->add_control( $LogoImageController );
Add color field
$WPCustomizer->add_setting( '_color' );
$TextColorController = new \WP_Customize_Color_Control(
	$WPCustomizer, '_color', array(
		'label'   => __( 'Farbe', 'forge12' ),
		'section' => 'deine_sektion'
	)
);
$WPCustomizer->add_control( $TextColorController );
Add selection field
$WPCustomizer->add_setting( '_decoration' );
$DecorationController = new \WP_Customize_Control(
	$WPCustomizer, '_decoration', array(
		'label'   => __( 'Dekoration', 'forge12' ),
		'section' => 'deine_sektion',
		'type'    => 'select',
		'choices' => array(
			'0' => __( 'Ohne' ),
			'1' => _( 'Unterstrichen' )
		)
	)
);
$WPCustomizer->add_control( $DecorationController );
This is what the whole thing looks like
Once you’re done, it should look something like this or something like this.

How to retrieve the data #
Now we still need to integrate the data into the theme. To access the parameters, use the following code:
get_theme_mod('<id des feldes>');For example, you can retrieve the text field created above with the following PHP code:
echo get_theme_mod('_hier_kommt_mein_text');Summary #
Using the WordPress Customizer to extend your theme and offer a little more usability is straightforward. WordPress proves once again that through the modular structure, a great flexibility is guaranteed.
I hope you enjoyed this short article. If you have any questions or feedback, feel free to leave a comment.
Artikel von:
Marc Wagner
Hi Marc here. I’m the founder of Forge12 Interactive and have been passionate about building websites, online stores, applications and SaaS solutions for businesses for over 20 years. Before founding the company, I already worked in publicly listed companies and acquired all kinds of knowledge. Now I want to pass this knowledge on to my customers.

