The ultimate guide to creating your own WordPress website — for beginners
Marc Wagner
October 26, 2022
If you don’t have a website, you simply don’t exist.
That’s actually how you could put it in this day and age where 50% of the world’s traffic comes from smartphones and tablets. In doing so, anyone who has some time and discipline can realize their own website.
Let’s get right to it!
Step 1: Find the right idea. #
Every beginning is hard, so you should take enough time to work out your ideas. What kind of website do you want to create and what kind of content should be presented to your visitors? You don’t have to write content for your pages yet, but you should create a small guide in advance.
Check if there are others who also find the topic interesting.
Take a look at Google to see if your topic is of interest to others. For example, if you select “Internet of Things” as the topic, your search will return 4 billion hits.

You should ask yourself if your idea is too broad if the number of hits is too high and maybe look for another topic or try to narrow it down.
Use a mind map as a guide.
Create a thread for yourself that ensures you don’t ramble too much. The best way to do this is with a mind map. You can do this classically with paper and pencil or you can use a tool like MindMeister to create the mindmap directly on the computer.
In the middle you simply write the actual topic. This could be your company, your blog or your online store, for example. Just what you are interested in at the moment.
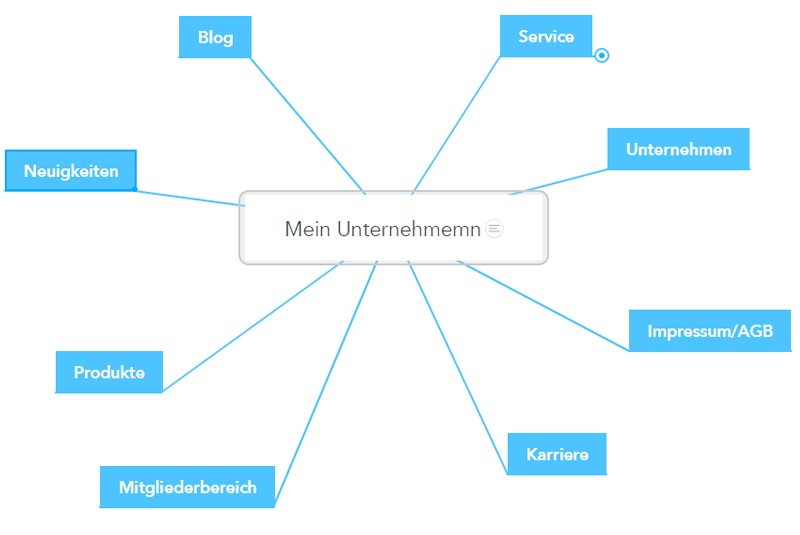
Around the theme you now position points that are important to you at the moment. Don’t worry, you can of course swap and replace everything later or add more. A website lives and grows, so you need to keep adapting to the market.
Step 2: Analyze competitors. #
Keep your friends close, but your enemies even closer. Of course, this is a bit of an exaggeration, but it illustrates quite well how important it is to keep an eye on your competitors. Of course, if you don’t know your competitors, you can Google to find some.
You can divide the competitor analysis into the following areas:
- Website
- Keyword analysis
- SEO OnPage
- Backlink profile
- Advertising campaigns
Analyze website
Look at your competitor’s website, also the sitemap. What do you particularly like and what would you do better? What areas have you not yet included in your mind map? Add all this information to your mind map.
Keyword analysis
For which keywords is your competitor positioned particularly high in search engines? How hard will it be to overtake your competitor? Are there perhaps alternatives that are better and faster to implement?
In this day and age, it is advisable to focus on long term keywords that have not yet been given too much consideration by competitors.
It’s best to write down all the keywords you find during your research. Because your content should then later be targeted to these or similar keywords.
SEO OnPage
How well has your competitor optimized their site for search engines? Often companies neglect the SEO measures after the creation of the website and at some point they just start publishing content and sharing images without paying attention to meta information and SEO relevant tags.
Look at your competitor’s individual pages and see how well they’ve been optimized.
Backlink profile
How many backlinks do your competitors have? Among other things, backlinks increase the domain rating and the page score of a website or a page. The factors indicate how qualitative the content of a web page is.
If your competitor already has a large number of backlinks, then you should also dedicate yourself to the topic of link building.
Advertising campaigns
When you search for a keyword on Google, you also get Google Ads displayed. Analyze the campaigns and see what products and services your competitors are focusing on in Google.
If you find a few campaigns that you really like, you should write them down. This will help you to better implement and plan your own campaigns later.
Step 3: Get hosting and a domain. #
To publish your website on the Internet, you need web space. For this purpose, there are so-called hosting providers such as Strato and Mittwald. There you can rent webspace, virtual and managed servers, as well as your own Windows and Linux servers.
Both providers are ideally suited for anyone who doesn’t feel like dealing with technical aspects. You can choose a WordPress package for both. WordPress packages are designed in such a way that you can easily install WordPress with a one-click installer. This allows you to focus completely on your website, its look and content.
Choose a suitable domain.
A domain is what the visitor types into their internet browser to get to your site. Therefore, it is important that you choose a name that your visitors can remember.
These tips will help you choose your domain:
- Prefer a .de/.com over all other top-level domains. Even though there are now dozens of different extensions, most people remember them better.
- Use the theme in the name. This helps search engines and your visitors directly understand what your website is about.
- Avoid numbers and hyphens. It’s hard to remember.
- Use a maximum of 2–3 words for your domain. The domains with only one word are unfortunately often already taken.
- Always good to use your name or a variation of it.
Once you have a few ideas, you can easily check the availability of the individual domains on Strato.
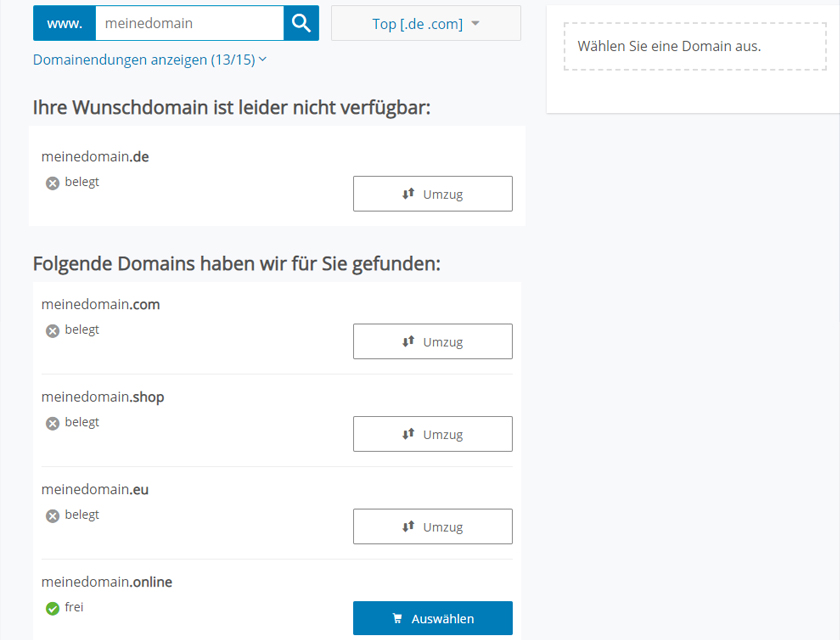
A little tip on the side: If you don’t have your own domain yet, you should also check the domain rating before buying. For this purpose ahrefs is recommended. The Domain Rating indicates how well your site will be listed in search engines. The scale here ranges from 1 — 100.
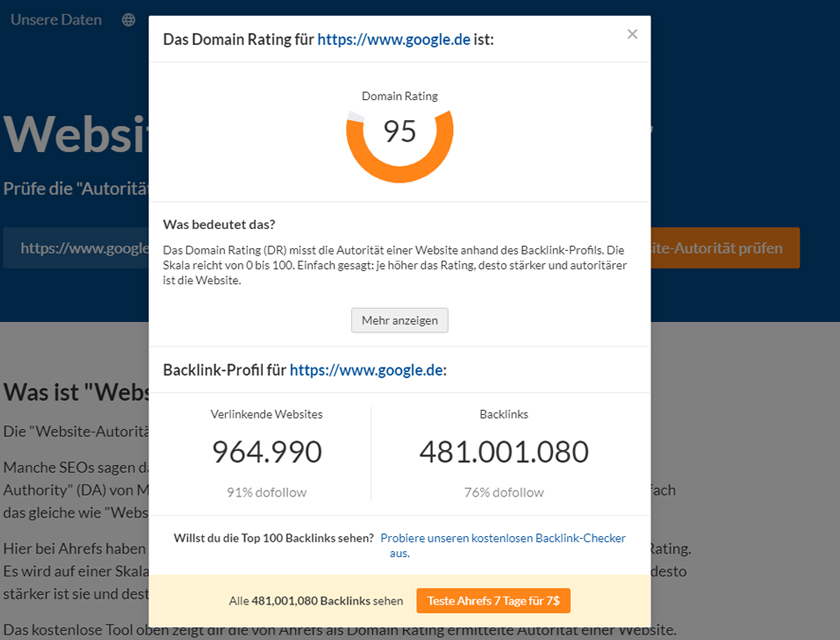
Of course, your domain rating will improve over time if you provide quality content on a regular basis, but a little bonus at the beginning is always appreciated.
Take your time when choosing the right domain. It can be a bit of a hassle, but it’s definitely worth the effort.
Step 4: Install WordPress #
Most pages on the Internet today are implemented with a content management system. WordPress is one of the most widely used content management systems with a market share of over 38%. This is mainly because it is user-friendly, powerful and easy to learn.
If you have created your hosting package with Strato, for example, you can install your website without any technical know-how.

Just follow the instructions and within a minute you will have your WordPress website up and running.
Step 5: Design your website with a WordPress theme. #
If you have set up WordPress for the first time, your website will look like this or something similar at first:
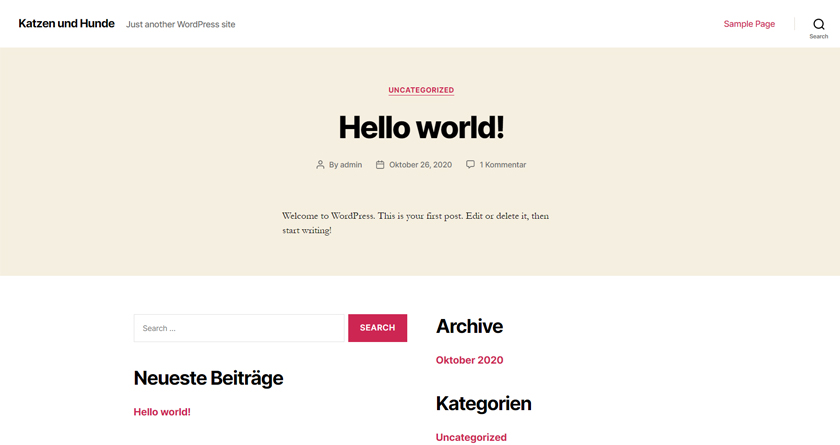
It doesn’t look that great yet, but it’s something to work with. Now to make your website more beautiful, we need a WordPress theme. Themes are designs that have been created specifically for WordPress and that integrate with the system.
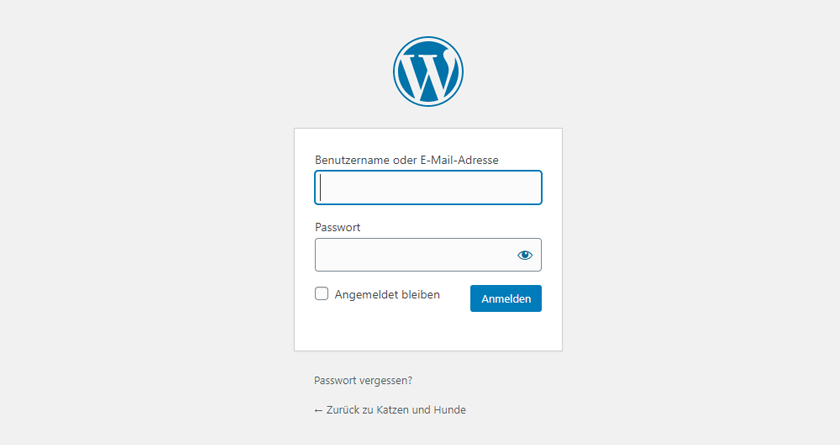
Now log in to the admin panel of WordPress first. To do this, simply call up the URL https://www.deine-domain.de/wp-login.php via your browser.
If you’ve never worked with WordPress before, the dashboard may slay you. But don’t worry, with time you will learn to deal with it.
To install a new WordPress theme, move the mouse over the menu item “Design” in the left navigation and then select the sub-item “Themes”.
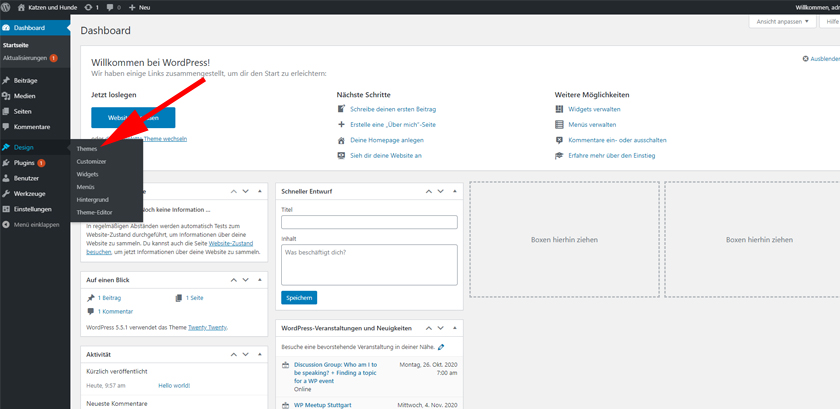
By default, the themes “Twenty Twenty”, “Twenty Ninteen” and “Twenty Seventeen” created by WordPress itself are already installed. If you click on “Add Theme” instead, you will get access to over 7,500 more themes.

Since tastes are usually different, you have to see for yourself which theme you like. You can narrow down the search using the filter function.

You can choose from theme, functions and layout. Choose the theme you want and take a look at the preview. This will help you to judge if you like the theme. If you are satisfied, click install.
I myself have now opted for Airi. After the installation you can activate the theme.
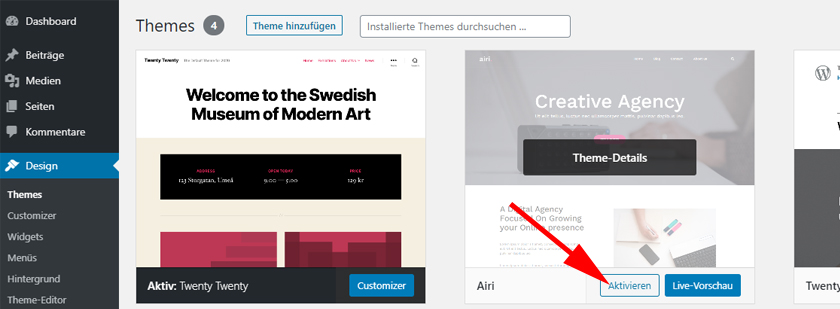
If you can’t find a theme, you can also buy a premium theme. A few good places to start for this are:
- Theme Forest
- MOJO Marketplace
- TemplateMonster
Step 6: Customize your WordPress website. #
Each theme offers different settings options. For this reason, of course, it is difficult to write a tutorial that covers all the features of all themes. For this reason, we stick to the basics.
First click on the “Customize” button to get to the settings.
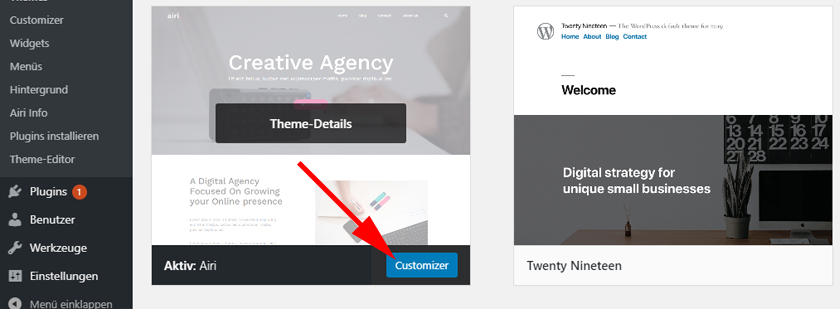
In the sidebar you will find all the settings options for your chosen theme.
Customize the title of your page.
To change the name of your site, you should first go to the “Site Information” section.
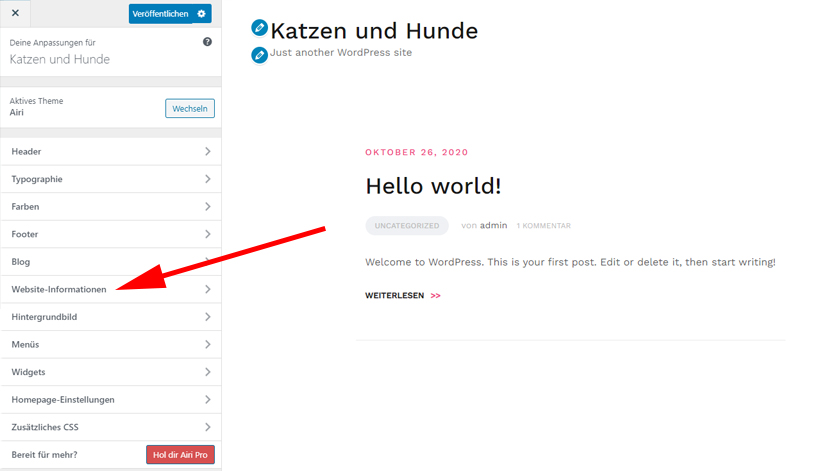
Here you can edit the name, slogan, logo and your fav icon. To save your changes, click the “Publish” button.
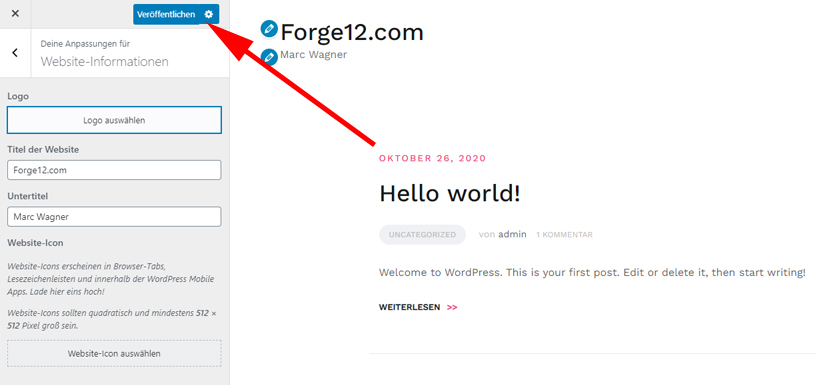
When choosing a title, make sure it includes the keyword you primarily want to be found under on Google. The title should also be no longer than 60 characters.
Switch from blog to website.
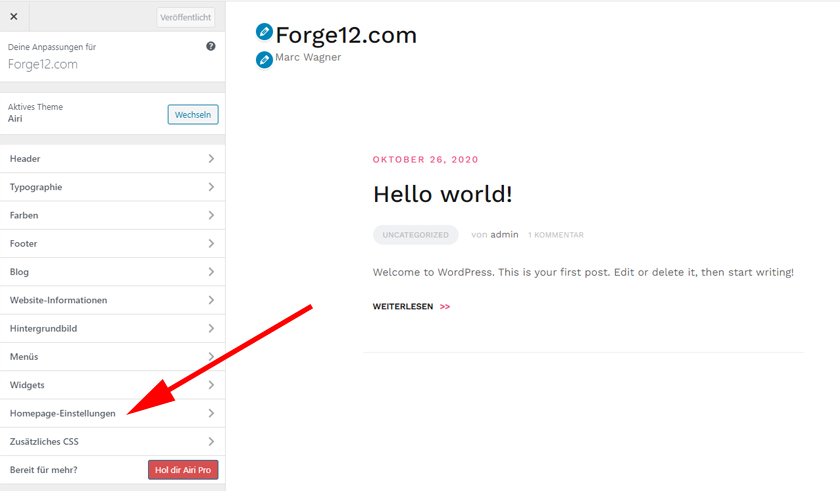
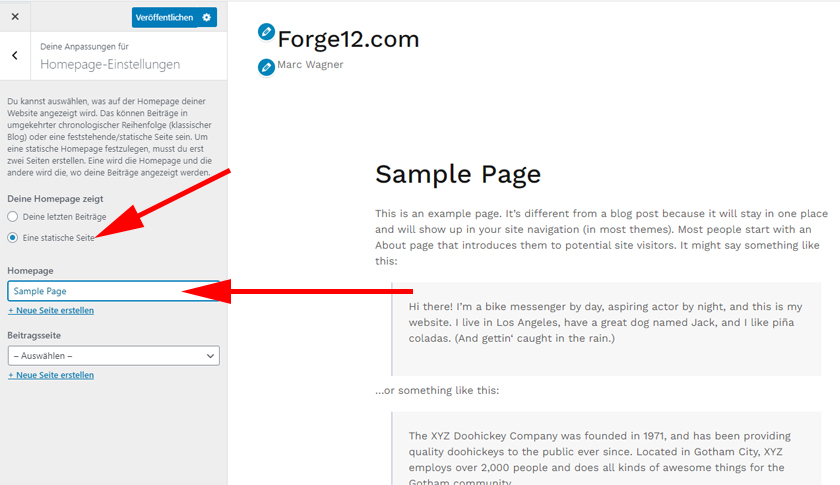
WordPress was originally intended to be a blog, so we still need to customize “homepage settings”. To do this, go to the “Home Page Settings” section to set the home page of your website.
First, select the “One static page” option. You will be presented with new options, including the “Homepage” selection field. Here you can now define your page, which should serve as the start page. Save your changes by clicking the “Publish” button.
Add a navigation.
What would a website be without a navigation. But there is an area for this as well. So let’s switch to the “Menu”.
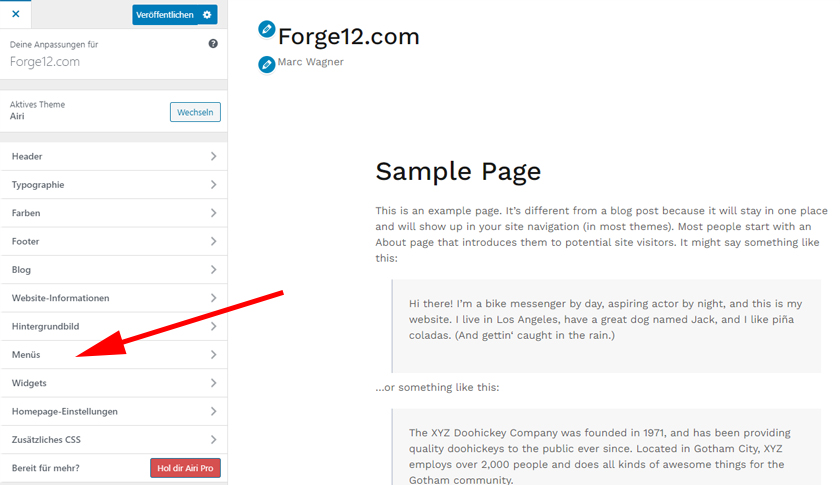
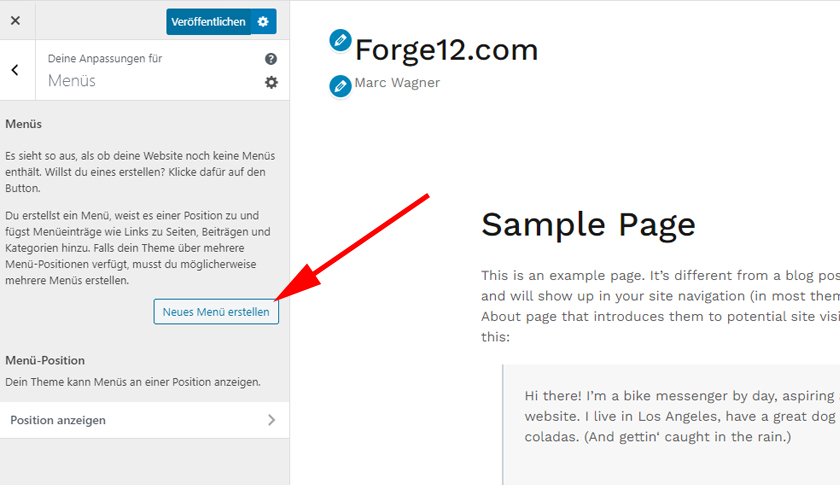
So far there are no menus, so now we have to create one first. Click on “Create new menu” to create a new menu.
You may now specify a name for your menu. You can choose the name freely. Then you select the position where the navigation should be displayed. Depending on the theme you have one or more choices here.
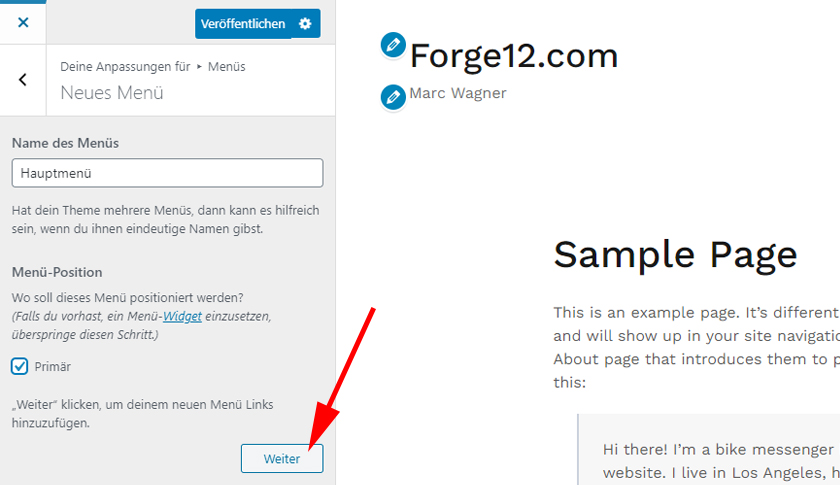
As soon as you click on “Next”, the menu will be created. Now we have to fill the menu, for this you click on “Add entries”.
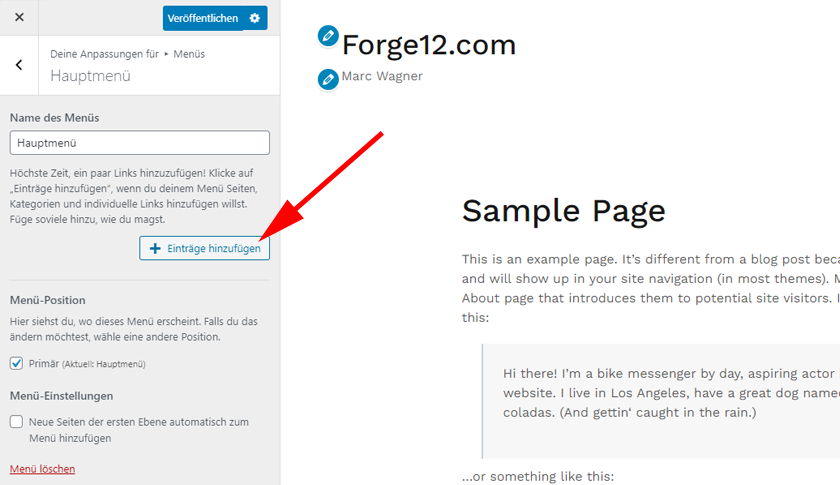
You will be presented with a list of elements that you can insert into your navigation.
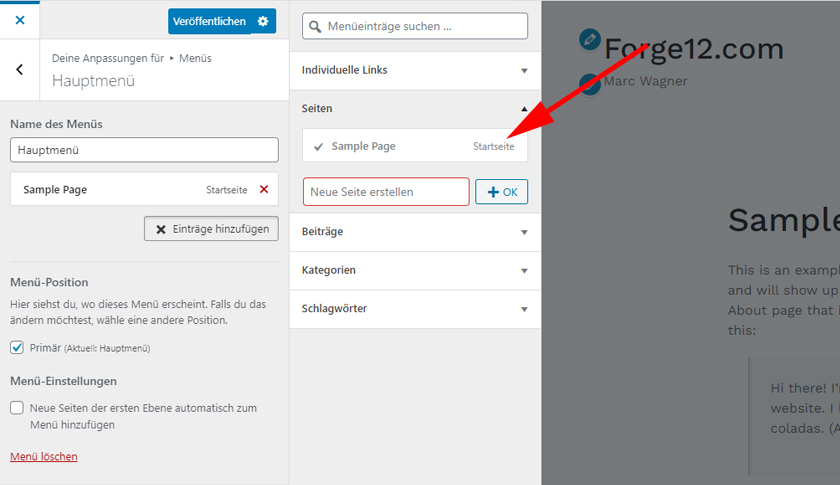
You can choose from:
- Pages — WordPress pages that you have created. Always add them via pages, this will automatically adjust the menu if something ever changes in your page structure.
- Posts — Here you can find all the contributions (also called “posts”) you have created.
- Categories — The categories of your posts.
- Keywords — The keywords of your posts.
- Custom Links — This allows you to add external links or links that require additional parameters. If you link to internal pages then you have to adjust the path here as well, otherwise your visitors will see an error page.
Now select the desired elements and fill them with your content. Once you have added all the items to your menu, you can save your changes by clicking “Publish”.
Of course, you can always return here if you want to change or replace your menu.
Install important plugins.
Plugins are extensions for your website. With a plugin you can add useful features to further customize your website.
Here you can find the top 5 plugins that are a MUST for every website!
One plugin you should not do without is “All in One SEO”. As you can probably already tell from the name, this is a plugin that helps you with your SEO measures.
Let’s go right ahead and install “All in One SEO”. To do this, we first go to “Plugins / Install”.
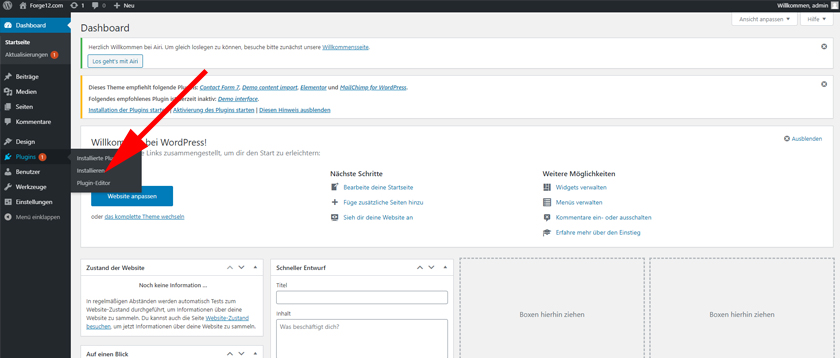
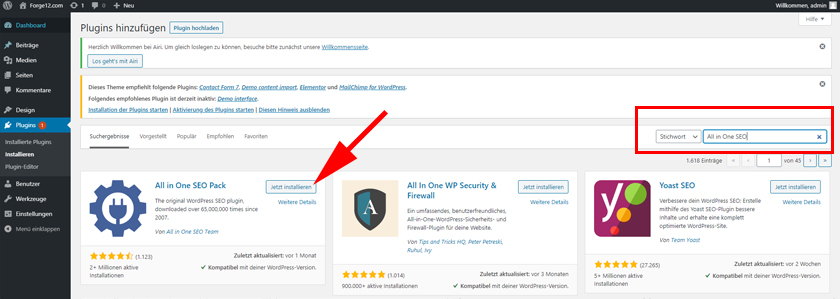
Use the search on the right to search for the plugin “All in One SEO”. Once you find it, you can install the plugin on your WordPress website by clicking “Install Now”.
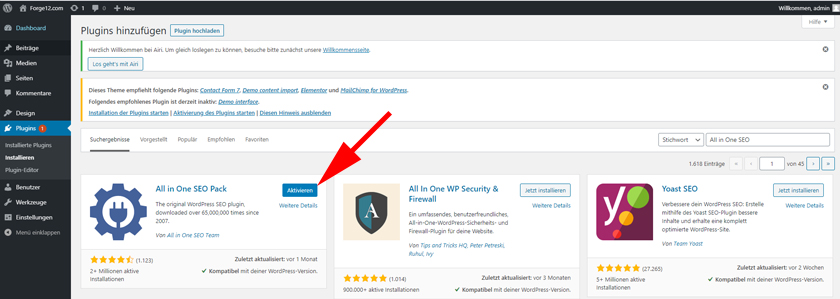
Once the installation is complete, you still need to activate the plugin. To do this, simply click on the new “Activate” button. You can disable individual plugins at any time if they cause problems with your site.
After activation, you can access the SEO plugin either from the left sidebar or from the navigation at the top of the website. Now switch to the main settings.
Now switch to your pages. As you can see, two new columns “SEO Title” and “SEO Description” have been added. You should provide these with meaningful texts, because these data are displayed in the Google search results.

Make sure that the title is no longer than 60 characters and the description no longer than 160 characters.

Once you’re done, you can check the SEO of the page at Seobility, for example. Just submit the URL to your site and you’re good to go.
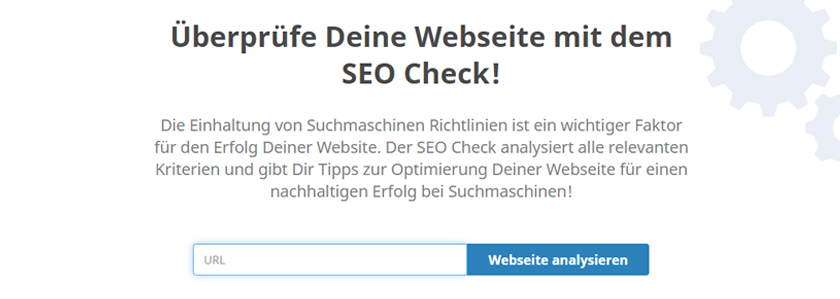
Of course, you get much more information than just meta information. Use the results to adjust the content of your page.
Regularly check the SEO rating of your individual pages to ensure that the search engine bots do not devalue you.
Enable talking URLs.
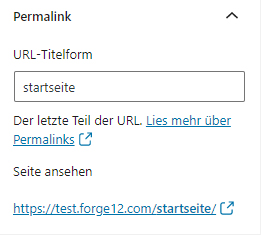
WordPress is based on permalinks. These are static links to your pages. When you create a page, a permalink is automatically created. By default, WordPress will set your link to https://deinedomain/?p=POSTID. This not only looks stupid, but also doesn’t help anyone.
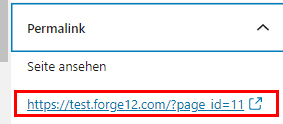
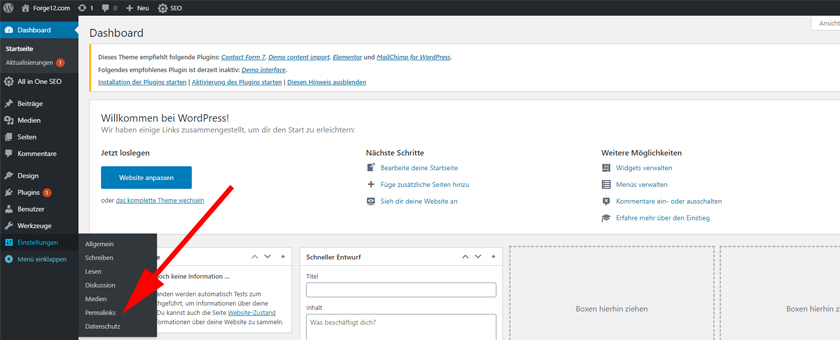
Luckily, you can change it all to talking URLs in WordPress with just a few clicks. Just switch to the settings for permalinks.
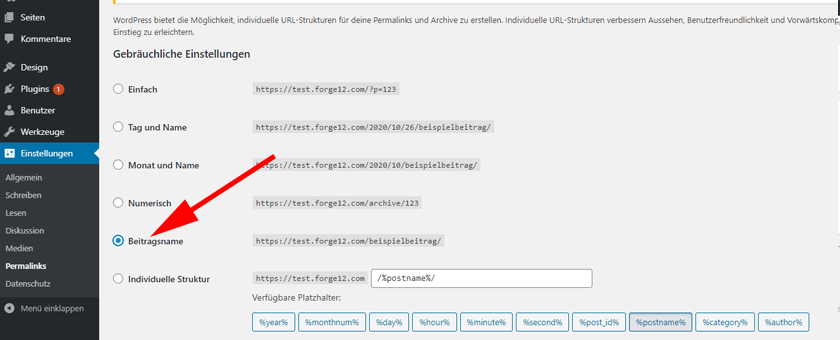
You have several options to choose from. I always use the “Post name” option here. This option creates a permalink from the title of the page. You can also manually adjust the permalink later for each individual page.
Save the settings afterwards. When you are done, the link will now look like this, for example:
Step 7: Add content #
Now let’s add a new page. To do this, switch back to the admin panel of WordPress and select “Create page”.
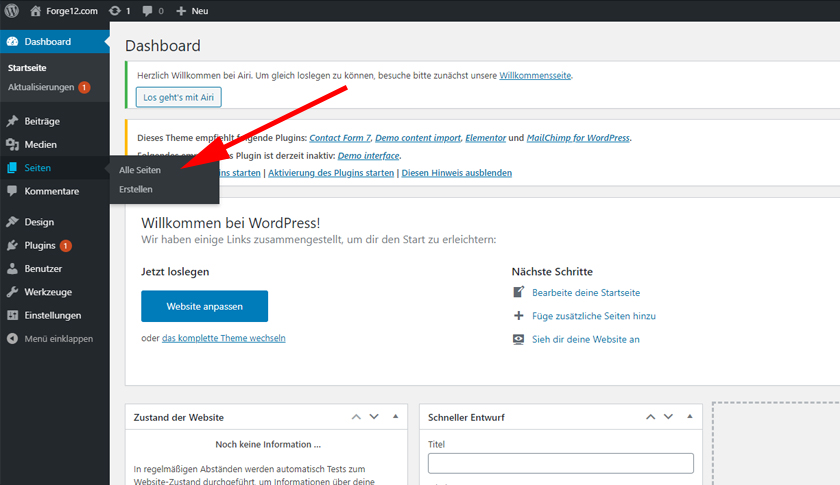
Now you come directly to the Gutenberg Editor. The Gutenberg editor was introduced with WordPress 5. Here you can easily place content on your page without HTML and CSS knowledge.
The editor is divided into 3 sections. You have the bar at the top of the screen. This offers you options to undo changes and to publish or preview your page.
In the middle you have the content editor, there you can add and move content.
And last but not least, you have the sidebar on the right. There you can set additional options for selected elements, such as colors, fonts and text sizes.
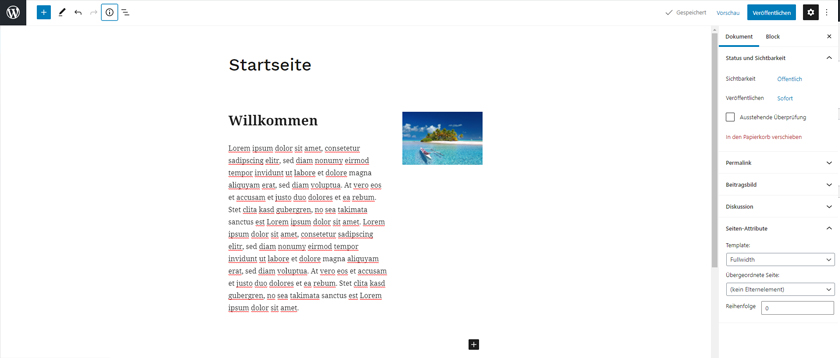
To add new content, simply click on the black box with the “+”.
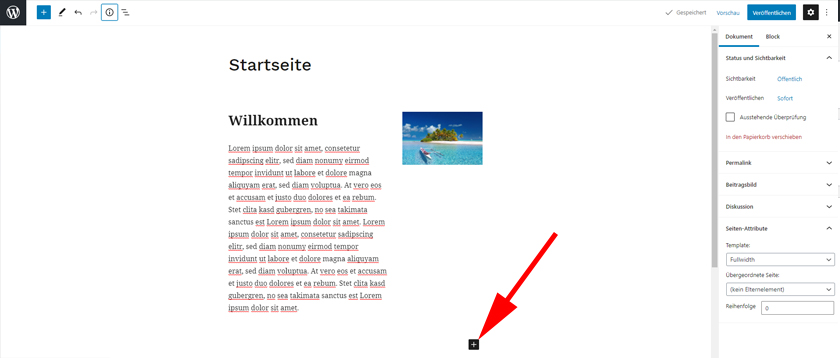
Gutenberg Editor already provides you with a selection of elements that you can use as templates (paragraphs, heading, list, images, tables, columns, groups, shortcodes and much more) to insert your content. Some themes extend the selection with additional options.
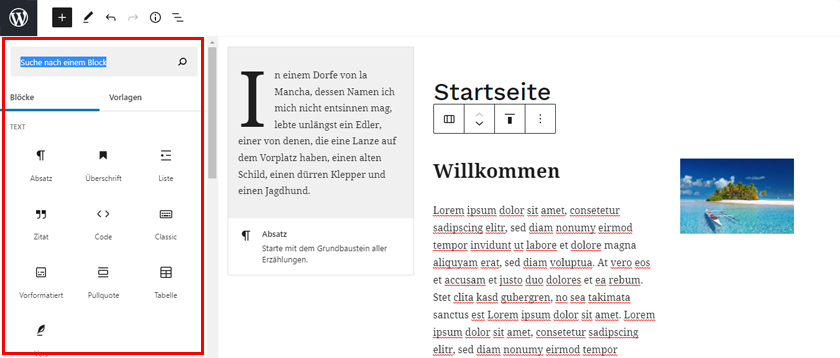
Select the appropriate element and start filling your page with content. If you are looking for images you can buy them on Shutterstock or Adobe Stock. You can find free alternatives at Unsplash and Pixabay.
For example, I first added a column and then added a heading and paragraph in the left column and an image in the right column. I quickly got the image via Pixabay. Of course, you can now design your pages the way you want.
Small tip: After inserting your content, you can still check your texts for grammar and spelling mistakes with Spell Check24.
Think also about SEO
When creating your pages, make sure to optimize the content for one keyword at a time. The keyword should appear in the H1 heading and of course in the text. Also make sure to alt tag images. The name of the file also plays a role. Ideally, you’ll create an infographic or image that fits the theme exactly and name it as such.
You should also make sure to build internal links. This will not only provide your visitors with additional relevant content, but will also ensure that your site is indexed faster by search engines.
Remember, be sure to add the meta information to the page at the end.
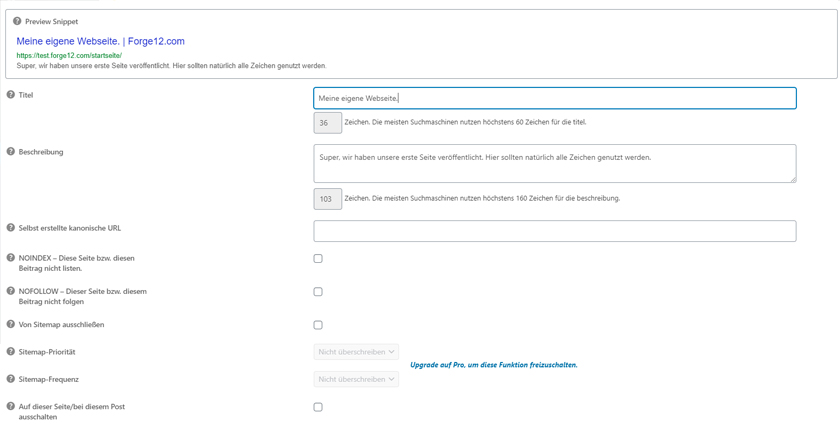
Choose a meaningful title for your page that also includes the keyword the page is optimized for. The same applies to the description.
Once you are done you can publish your page. Don’t forget to update your menu if you want to link your page in it.
Great, you have published your first page. Now it’s up to you to create the rest of your website content and design everything according to your wishes.
Also pay attention to the display for smartphones and tablets.
As mentioned at the beginning, over 50% of traffic is caused by mobile devices. In addition, Google has started to introduce mobile-first indexing. This ultimately means that you’ll rank lower in search engines if your site doesn’t display optimally on mobile devices like iPhones and iPads.
For this reason, you should always pay attention to mobile display when creating your website. Sites like mobiReady allow you to test your website for mobile devices.
Step 8: Imprint, data protection and DSGVO. #
What must not be missing on any page is the imprint and a privacy policy. If you haven’t created these two pages yet, you should definitely do so now.
A good place to start for this is e‑recht24.de. There you can generate a privacy policy and an imprint online.
Of course, since these are legal statements, you should always contact a lawyer to be on the safe side.
The Cookie Opt-In!
With the introduction of the GDPR, it was also stipulated that website operators must obtain the consent of visitors before setting so-called cookies.
Cookies store information about the visitor and place it on his computer. Sounds complicated, but it’s not. You will surely have searched on Google for products that were then suggested to you on Amazon and vice versa. Among other things, this is realized via cookies.
WordPress itself currently only sets cookies when you log in to the backend. However, there are also themes, plugins and of course scripts like Google Analytics that also set cookies automatically.
You should therefore make sure that your cookies are only set when they have been allowed by your visitor.
I always use Borlabs Cookie for this. The plugin is specifically designed for WordPress and offers you various settings for your system.
You can find detailed instructions on how to use and configure Borlab’s cookie at BlogMojo.
Step 9: Google Search Console #
Once you are done with your site, you should submit your website to Google. The Google Search Console will help you with this. It also offers you other useful tools to help you optimize your website.
Go directly to Google Search Console and click “Start Now”.
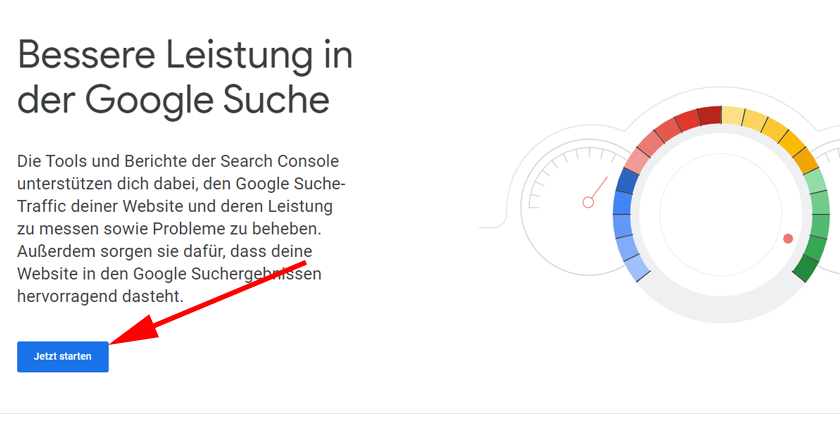
Now either create a new account or log in with your existing data.
Once you have registered, you can create a new “property” for your domain.
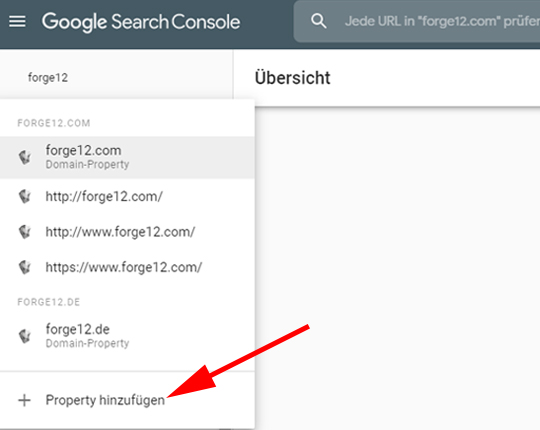
You have two options to choose from. Either you validate via a DNS entry of your domain or you use the URL prefix. I recommend you to use the DNS prefix. All you have to do is upload an HTML file to your server.

Once you have successfully confirmed your “Property”, you can select it.

Then go to the Sitemaps tab and add the sitemap for your page there. Thanks to the All in One SEO plugin, your sitemap has already been created automatically.
You can reach your sitemap via https://deinedomain/sitemap.xml
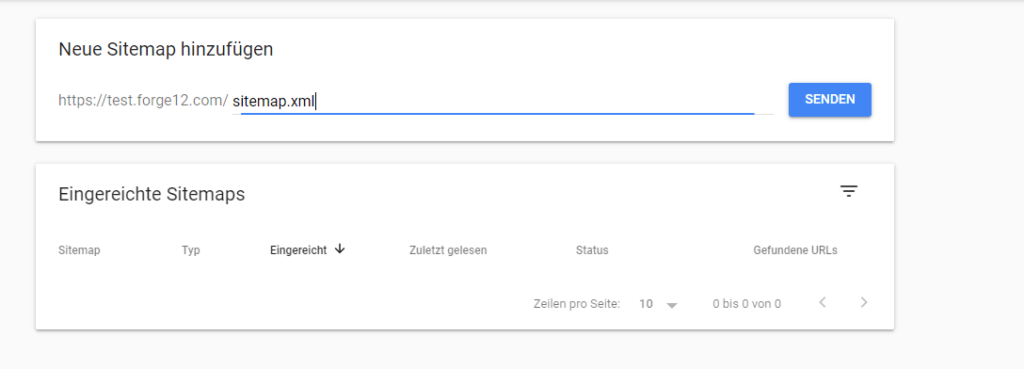
Then click “Submit” to submit the sitemap. Google briefly confirms this with a pop-up and adds the sitemap to the queue.

Conclusion #
Creating a website is easy. Creating a website that is successful requires hard work, discipline and perseverance.
Thanks to pre-built themes and a huge selection of plugins, WordPress websites are more affordable nowadays than ever before. Of course, there are one or two stumbling blocks that can lead you astray, but it’s worth the effort.
Always remember, every journey begins with the first step, so it is with your website.
Feel free to reach out to us in the comments and also contact us with any questions at any time. We appreciate your feedback. Let us know if we’ve forgotten anything or you think of something else that could be added.
Artikel von:
Marc Wagner
Hi Marc here. I’m the founder of Forge12 Interactive and have been passionate about building websites, online stores, applications and SaaS solutions for businesses for over 20 years. Before founding the company, I already worked in publicly listed companies and acquired all kinds of knowledge. Now I want to pass this knowledge on to my customers.

