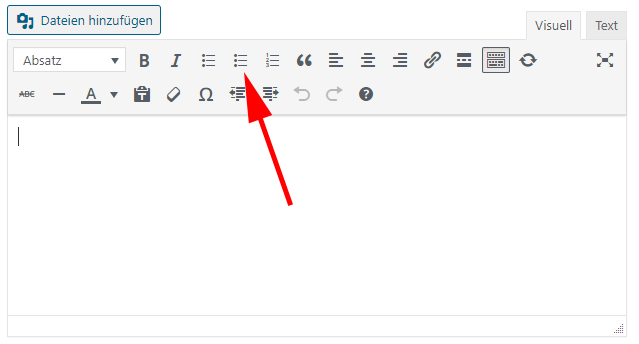
This is how easy it is to extend the TinyMCE editor for WordPress.
Marc Wagner
November 5, 2020
The TinyMCE editor can be easily extended in WordPress with additional buttons and tools. This allows you to add shortcodes and ready-made HTML structures to the page at the push of a button.

To extend the TinyMCE editor, we need to perform two steps:
- Store the function of the extension in JavaScript.
- Register the extension with PHP and WordPress hooks.
Make preparations #
Change to the child theme directory and create the needed files there:
- CustomTinyMCEButton.js
- CustomTinyMCEButton.php
Once you have created the files, we need to include the “CutomTinyMCEButton.php” into the “functions.php” of the child theme. To do this, open the “functions.php” and add the following line at the end of the file:
require_once('CustomTinyMCEButton.php');Register the extension with PHP. #
Open the “CustomTinyMCEButton.php”. We now need to integrate our extension into the toolbar of the TinyMCE editor and then make sure that our JavaScript file, which contains the function of the extension, is loaded. In WordPress, we can conveniently use the filters created for this purpose:
- mce_external_plugins
- mce_buttons

Now let’s create the functions that can be used by the filters.
register_customTinyMCEButton
This function ensures that our extension is later displayed in the desired toolbar.
function register_customTinyMCEButton( $buttons ) {
	$buttons[] = 'customTinyMCEButton';
	return $buttons;
}Alternatively, we can directly specify at which position the extension should be displayed later.
function register_customTinyMCEButton( $buttons ) {
	array_splice( $buttons, 4, 0, 'customTinyMCEButton' );
	return $buttons;
}
Now the extension is inserted at position 4 in the toolbar.
set_customTinyMCEButtonJS
In order for our extension to later execute the function of our JavaScript file, we still need to include it.
function set_customTinyMCEButtonJS( $plugin_array ) {
	$plugin_array['customTinyMCEButton'] = get_stylesheet_directory_uri() . '/CustomTinyMCEButton/CustomTinyMCEButton.js';

	return $plugin_array;
}
Last but not least, we package the whole thing and make sure that only authorized users can use our extension.
add_action( 'after_setup_theme', 'setup_customTinyMCEButton' );

function setup_customTinyMCEButton() {
	if ( ! current_user_can( 'edit_posts' ) && ! current_user_can( 'edit_pages' ) ) {
		return;
	}
	if ( get_user_option( 'rich_editing' ) !== 'true' ) {
		return;
	}

	add_filter( 'mce_external_plugins', 'set_customTinyMCEButtonJS' );
	add_filter( 'mce_buttons', 'register_customTinyMCEButton', 9999999 );
}
This concludes the server side requirements.
Adding the functionality with JavaScript #
We have now registered our extension, but in order for the TinyMCE editor to know what kind of extension we want to create, we need to define it via JavaScript. There are already functions we can access for this as well. Paste the following code into your “CutomTinyMCEButton.js”.
(function () {
    tinymce.PluginManager.add('customTinyMCEButton', function (editor, url) {
        // Add Button to Visual Editor Toolbar
        editor.addButton('customTinyMCEButton', {
            title: 'Liste hinzufügen',
            cmd: 'customTinyMCEButtonCallback',
            icon: 'mce-ico mce-i-bullist',
            tooltip: 'Aufzählungsliste'
        });
        editor.addCommand('customTinyMCEButtonCallback', function () {
            var selected_text = editor.selection.getContent({
                'format': 'html'
            });

            var return_text = '<ul class="list-white"><li>' + selected_text + '</li></ul>';

            editor.execCommand('mceReplaceContent', false, return_text);
        });
    });
})();
Now let’s take a closer look at the code.
tinymce.PluginManager.add('customTinyMCEButton', function (editor, url) {});First we tell the PluginManager that there is a new extension that we have named “cutomTinyMCEButton”. Here you should make sure that you use the same name that you specified in PHP.
editor.addButton('customTinyMCEButton', {
    title: 'Liste hinzufügen',
    cmd: 'customTinyMCEButtonCallback',
    icon: 'mce-ico mce-i-bullist',
    tooltip: 'Aufzählungsliste'
});
In our “callback” function we tell the “editor” that the extension is a button. Here we can pass different parameters, we have limited ourselves to the most relevant ones. Important is finally the following line:
cmd: 'customTinyMCEButtonCallback',This specifies which “Command” should be called when the button is clicked.
editor.addCommand('customTinyMCEButtonCallback', function () {
    var selected_text = editor.selection.getContent({
        'format': 'html'
    });

    var return_text = '<ul class="list-white"><li>' + selected_text + '</li></ul>';

    editor.execCommand('mceReplaceContent', false, return_text);
});
With “addCommand” we can pass new commands to the editor. As you can see, we pass here the string “customTinyMCEButtonCallback” that we specified before.
Now, every click on the button calls our function. We can now store anything we want there. In our example, we create a list to which we pass our own class and then insert it into the editor.
Now, as soon as we open the WordPress backend, we can see our new button in the TinyMCE editor.

The complete code #
CustomTinyMCEButton.php
add_action( 'after_setup_theme', 'setup_customTinyMCEButton' );

function setup_customTinyMCEButton() {
	if ( ! current_user_can( 'edit_posts' ) && ! current_user_can( 'edit_pages' ) ) {
		return;
	}
	if ( get_user_option( 'rich_editing' ) !== 'true' ) {
		return;
	}

	add_filter( 'mce_external_plugins', 'set_customTinyMCEButtonJS' );
	add_filter( 'mce_buttons', 'register_customTinyMCEButton', 9999999 );
}

function register_customTinyMCEButton( $buttons ) {
	array_splice( $buttons, 4, 0, 'customTinyMCEButton' );
	return $buttons;
}

function set_customTinyMCEButtonJS( $plugin_array ) {
	$plugin_array['customTinyMCEButton'] = get_stylesheet_directory_uri() . '/CustomTinyMCEButton/CustomTinyMCEButton.js';

	return $plugin_array;
}
CustomTinyMCEButton.js
(function () {
    tinymce.PluginManager.add('customTinyMCEButton', function (editor, url) {
        // Add Button to Visual Editor Toolbar
        editor.addButton('customTinyMCEButton', {
            title: 'Liste hinzufügen',
            cmd: 'customTinyMCEButtonCallback',
            icon: 'mce-ico mce-i-bullist',
            tooltip: 'Aufzählungsliste'
        });
        editor.addCommand('customTinyMCEButtonCallback', function () {
            var selected_text = editor.selection.getContent({
                'format': 'html'
            });

            var return_text = '<ul class="list-white"><li>' + selected_text + '</li></ul>';

            editor.execCommand('mceReplaceContent', false, return_text);
        });
    });
})();
Summary #
As you can see, even without expert web development knowledge, it is possible to add new buttons in WordPress for TinyMCE editor.
I hope this article was helpful for you. Have you ever extended the TinyMCE editor? What have you done with it?
Artikel von:
Marc Wagner
Hi Marc here. I’m the founder of Forge12 Interactive and have been passionate about building websites, online stores, applications and SaaS solutions for businesses for over 20 years. Before founding the company, I already worked in publicly listed companies and acquired all kinds of knowledge. Now I want to pass this knowledge on to my customers.

