Move WordPress — The complete guide for 2022
Marc Wagner
October 26, 2022
The WordPress move also works without a plugin. Usually even smoother and faster. For a beginner, the move may seem like a mammoth task at first glance, but it’s not at all.
Of course, depending on the size of the site, it may take more or less time, but the steps are always the same in 99% of cases.
- Download the files from the current server using an FTP program of your choice (e.g. FileZilla).
- Export your database (e.g. PhpMyAdmin, Heidi SQL, Data Grip).
- Import your database.
- Customize database.
- Adjust the local data.
- Upload the local files.
- Finalize move.
Too complicated? No problem, just use a plugin: Move WordPress with Duplicator.
Copy files with FTP/SFTP #
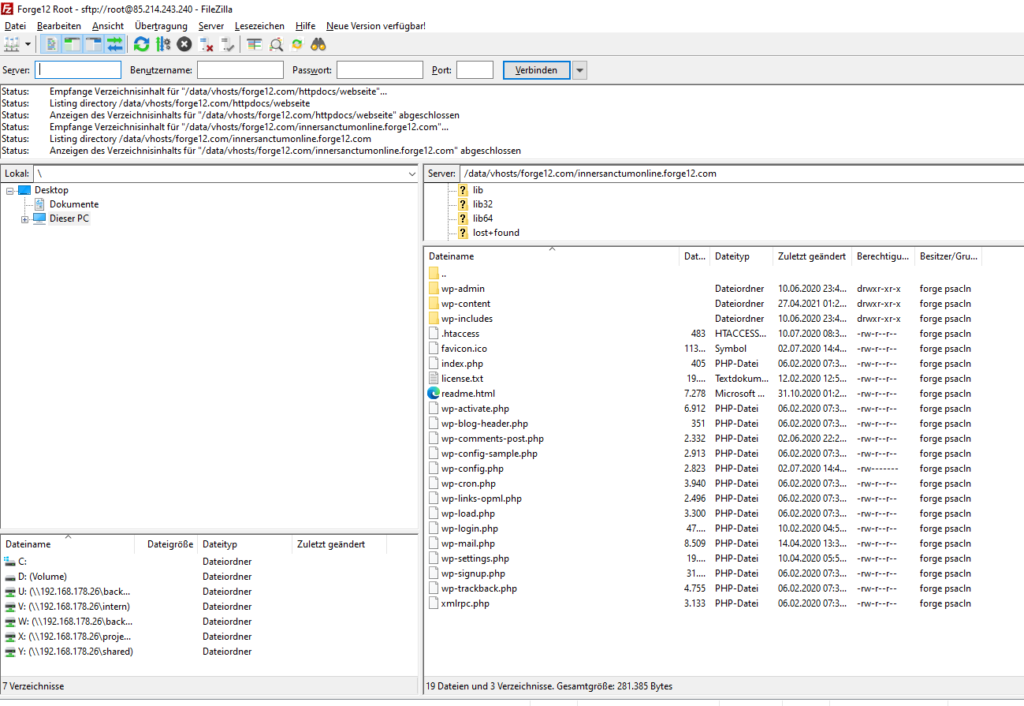
The first thing you need to do is download your data. You can do this comfortably with a FTP client (e.g. FileZilla). Afterwards all files are available locally.
To do this, simply select the files from WordPress via your FTP program. You can see which ones in the following figure (bottom right).
Save.
Downloading the files may take some time. To save time, however, we can continue with the database in the meantime.
Export WordPress database with PhpMyAdmin #
All the contents of your website are stored in the database. Therefore, we need to export them first. Most web hosts provide PhpMyAdmin for this purpose. PhpMyAdmin is a web application with a UI for database management.
Once you have logged in to your database, go to the Export tab.
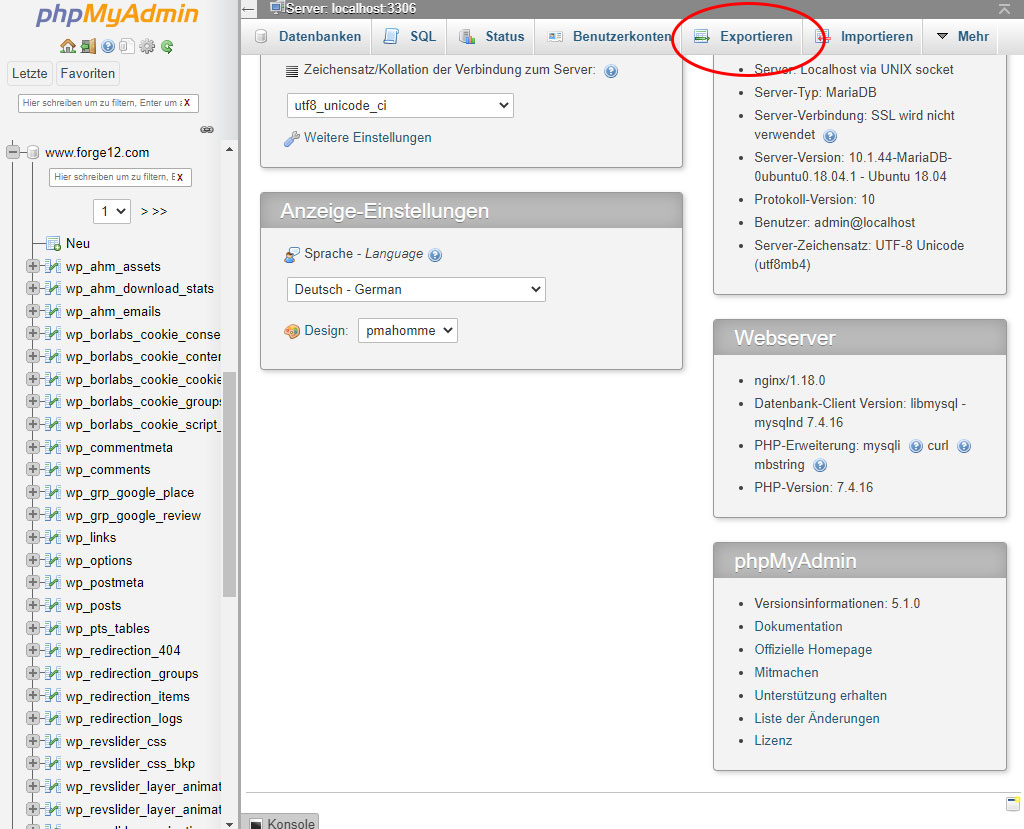
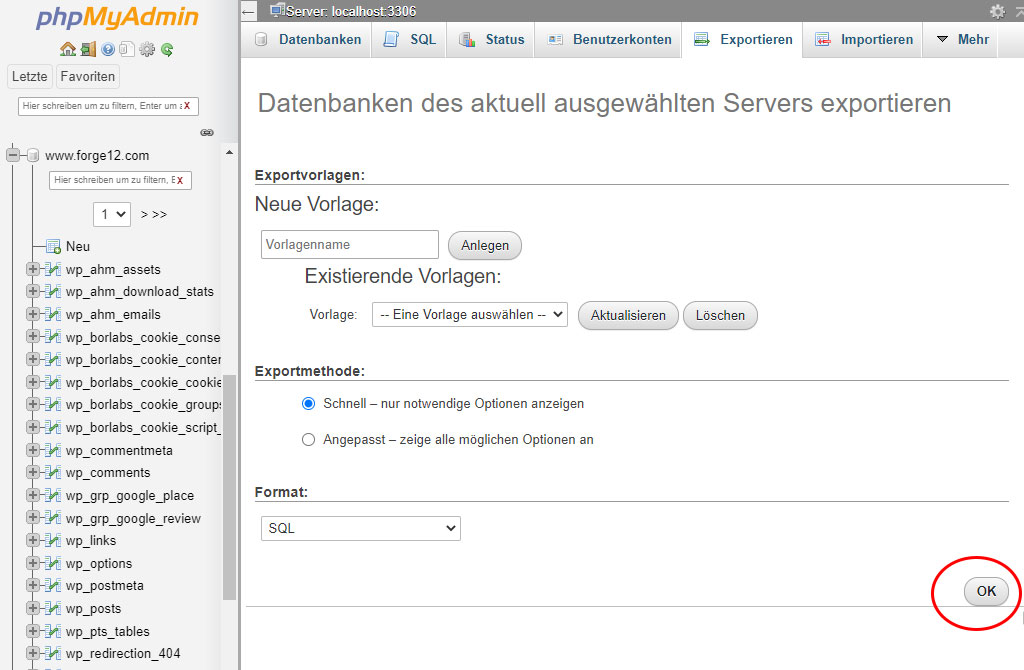
On the following page you just have to confirm by clicking Ok to start downloading your database.
Import WordPress database with PhpMyAdmin #
Now switch to your new server and create a new database there. Make a note of the username and password for later. We need it for the wp-config.
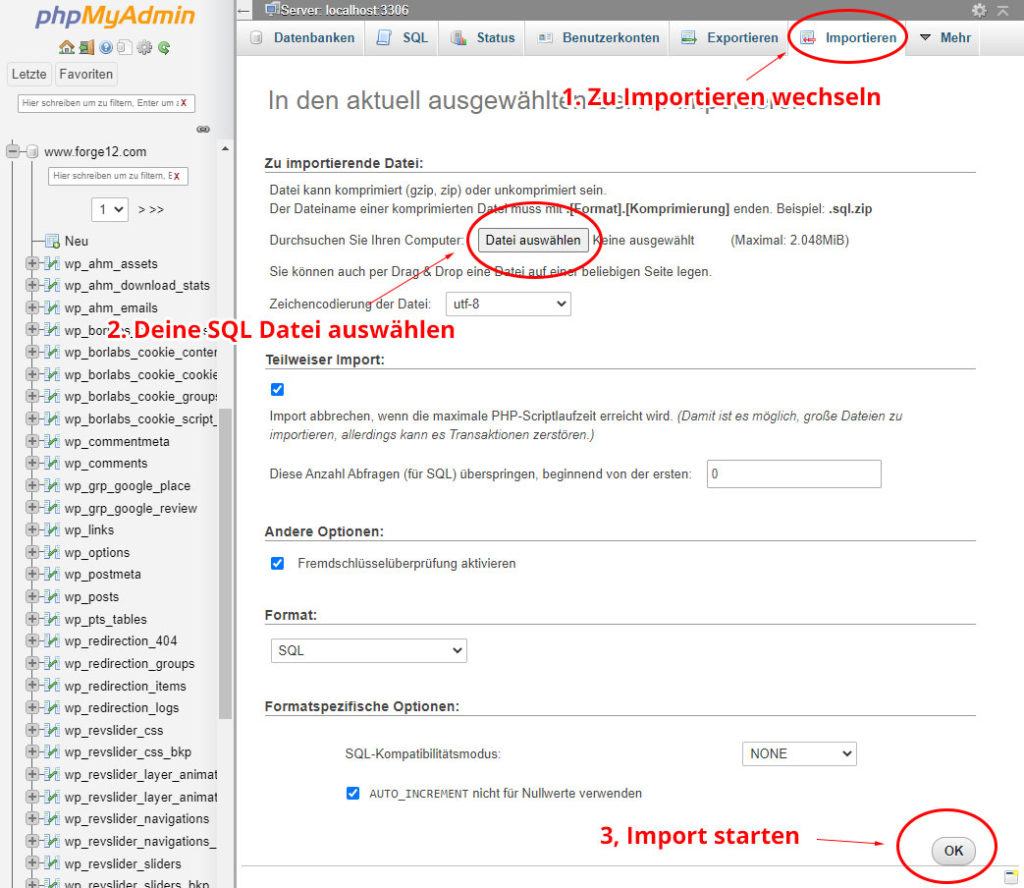
To import the database, switch to the Import tab.
Customize MySQL database for WordPress #
If you are moving the domain as well, you can skip this step. Otherwise, we still need to adjust the database so that WordPress also knows the new domain.
Customize wp_options table
In the wp_options table, we first need to adjust two entries. These are the siteurl and home.
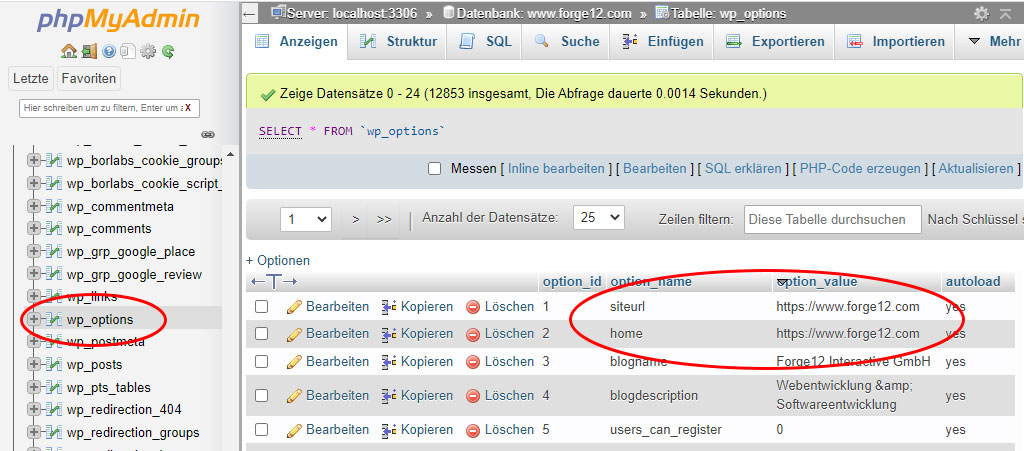
Replace it with your new domain. Make sure you specify the protocol (https) as well.
Of course, the whole thing is faster with SQL, for this you change to the SQL tab and enter the following query there:
UPDATE wp_options SET option_value = replace(option_value, 'https://www.meine-alte-domain.com', 'https://nwww.meine-neue-domain.com') WHERE option_name = 'home' OR option_name = 'siteurl';Customize WP-Config #
Next, we need to adjust the database data in your site’s wp-config.php. To do this, change to the folder where you have stored your WordPress data locally.
In the main directory you will find the file wp-config.php. The best way to open them is with NotePad++.
There you will find the following entries:
/**
 Ersetze datenbankname_hier_einfuegen
 mit dem Namen der Datenbank, die du verwenden möchtest.
 */
 define( 'DB_NAME', 'www.forge12.com' );
 /**
 Ersetze benutzername_hier_einfuegen
 mit deinem MySQL-Datenbank-Benutzernamen.
 */
 define( 'DB_USER', 'root' );
 /**
 Ersetze passwort_hier_einfuegen mit deinem MySQL-Passwort.
 */
 define( 'DB_PASSWORD', '' );
 /**
 Ersetze localhost mit der MySQL-Serveradresse.
 */
 define( 'DB_HOST', '127.0.0.1' );
Now enter the new access data to your database here.
| DB_NAME | Here you enter the name of the database |
| DB_USER | The user with which you log in to your database |
| DB_PASSWORD | The password you specified for the database. |
| DB_HOST | The path to the database. Mostly this is “localhost” or “127.0.0.1”. Some providers (e.g. IONOS) use an alternative address. |
Upload files to the new server #
Now you can start uploading your files to your new server using your FTP client (e.g. FileZilla). Enter the FTP data for your new web host. Then change to the main directory of your hosting and upload the files.

Once you’re done, the structure should be the same as your old website.
Complete move #
The basic settings have been made — but your page will probably not yet be displayed as you hope. This is because we still have to make a few final adjustments.
To do this, go to the WordPress admin panel of your new site. (https://deineneuedomainXYZ.de/wp-login.php)
First, go to Settings, Permalinks and confirm the Save Changes button once. This will update the permalinks and regenerate the .htaccess file of your website.
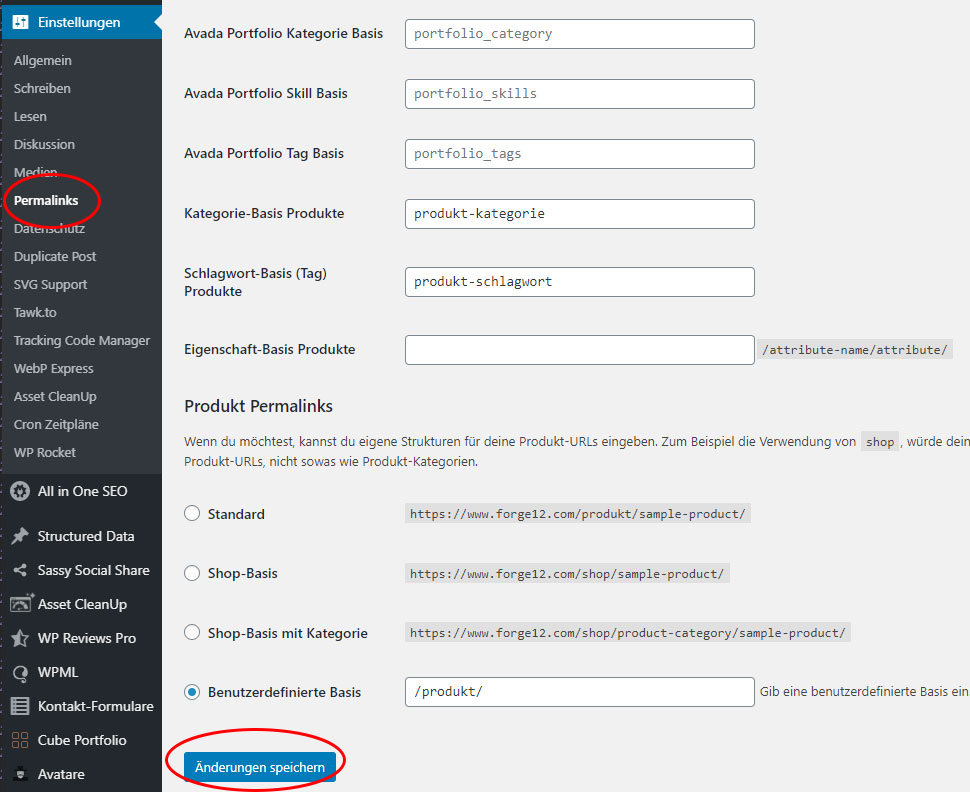
Next, we install the Better Search Replace plugin. This allows to search the database for links and replace them.
Wait, you say, why do I need a plugin? This can also be done with SQL. Partially Correct! But there are actually plugins and themes that serialize your data.
Then the whole thing looks something like this in the database:
a:5:{i:0;i:10;i:1;s:19:"www.meine-domain.de";s:16:"Ich bin ein Text";}What is interesting here is this part:
s:19:"www.meine-domain.de";This specifies how long the string behind it is — in our example: 19 characters. But if you change the domain and it is not exactly 19 characters long again, you will get an error when executing it.
However, the Better Search Replace plugin can be used to work around the problem. There, the data is first read from the database, deserialized and then stored again in serialized form.
You see, we have already eliminated another potential source of error. Now install the plugin, you will find it under Tools — Better Search Replace.

After installing and activating the plugin, you just fill in the fields. Pay attention to the spelling.
By pressing CTRL+A you can select all tables in which you want to search for the occurrence. We want to replace all domains, so we select all tables for this.
If you are unsure, you can still activate the test run at the end. Only a search is performed — no data is changed.
Once you are sure that everything fits, uncheck the Test Run box and click the Start Search/Replace button. After that, the move is complete.
Conclusion #
Congratulations — you have successfully completed the move of your WordPress website. As you can see, it’s not rocket science with standard pages. WooCommerce stores can also be moved easily in this way.
Of course, there are always exceptions. Not every website is the same and depending on plugins, extensions and customizations it can happen that you have to customize something else as well.
That’s what we’re here for. We perform WordPress moves for businesses quickly and easily.
If you need help, you can either book our WordPress removal service, or book an appointment with one of our developers for problem solving.
Artikel von:
Marc Wagner
Hi Marc here. I’m the founder of Forge12 Interactive and have been passionate about building websites, online stores, applications and SaaS solutions for businesses for over 20 years. Before founding the company, I already worked in publicly listed companies and acquired all kinds of knowledge. Now I want to pass this knowledge on to my customers.

